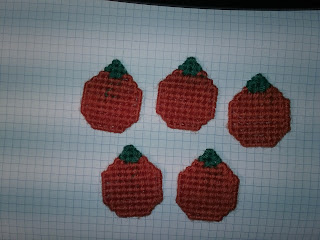
I have been making Plastic Canvas items since 2009 when a friend had a class for our Singles group.
I found that I really loved this craft. It was something that I could do with my limited vision.
I use the size 7 plastic Canvas. Which is 7 squares per inch.
I had made these Ghost Baskets in 2010 and I loved the Ghost.
The pattern is from this Leaflet.
I love the Ghost - however the basket is really small. So this year I decided I wanted to make a large container decorated with the Ghosts and pumpkins.
After I made the container my daughter said I should add a Tombstone!
So I found a pattern that said Trick or Treat and added that to the Tombstone. I had an extra Ghost and added that to the Tombstone.
I had made this tiny Black cat in 2012 and so I added her to the top of the Tombstone.
Ha Ha - My owl is grabbing the Cat!
Finished product and below is instructions and patterns.
You will need two or three sheets of Plastic Canvas, the yarn colors of your choice, a Needle point blunt end needle that has a large eye, "Googly - eyes", a glue gun and glue.
I glued the googly eyes on the ghosts with the glue in the glue gun.
The photos here should print nicely to 8 1/2 by 11 paper. You could probably print in black ink and save the photos for referral.
First I made 5 Ghosts as per this pattern.
Then I made 9 of the Pumpkins and I made them a bit larger.
Next I cut out the plastic canvas as a pattern for a cube Tissue Box container. That is 35 holes long or tall by 31 holes width.
It can be slightly bigger as the one pattern I have suggests making the container 30 holes wide by 36 holes long or tall. So you are cutting 4 sides and one bottom. The bottom is made with the same width, in my case - 31 holes by 31 holes square.
There is no top because the container is open to fill with Halloween candy and the Tombstone!
Smaller Squares Larger Squares
The two sides have smaller squares and the other two sides.
have larger squares.
Pattern of the stitching for the larger squares. As you can see diagonally it is 11 stitches for a square and takes up 6 holes on each side of the square. Reverse the alternate color so it is the opposite pattern the way the yarn is stitched.
Pattern for the smaller squares. As you can see diagonally it is 7 stitches for a square and takes up 4 holes on each side of the square.
First I did all the squares in Purple first. Working diagonally down the plastic canvas. Then I saw I had an uneven amount of squares at the end to make a complete square. I filled in as you can see at the bottom of each of the squares.
After I did all the Purple, I added in the black yarn. When you complete the 4 sides you can add the Ghosts and Pumpkins. Then stitch together the 4 sides. Lastly add the unworked bottom.
I made this container two different sizes of Checkerboard pattern to reflect the craziness of Halloween. I love the Checkerboard pattern!
The Tombstone
I did the same large square pattern for the Tombstone. In this photo you can see how the 4 squares make a lovely pattern when you reverse the stitching.
Of course I did the bottom part first then I had to piece in the top with the rounded edges.
When I worked the gray after I did the words Trick or Treat, it was difficult to fill in the squares exactly correctly.
Some people do the words after they make their background pattern.
After I had made the square tombstone my daughter said it would look better if it had a "rounded" top to it.
So I added a piece that was more rounded looking at the top. Of course you will cut your piece so that it is the way you want it.
Also I cut two pieces of plastic canvas for the tombstone so it would stand up. The thinner plastic canvas will not stand up straight unless you use two pieces back to back.
It is not hard to work the yarn through the two pieces.
I used this pattern as a guideline for the words Trick or Treat.
I have quite an extensive collection of Plastic Canvas Patterns at Pinterest. You can find them all at :
I have five dedicated boards for Plastic Canvas separated by Hollidays.
For the cat - I could not find the original pattern so I made one to approximate what I did make back years ago.
The mini cat is cut on the diagonal of the Plastic canvas. The cat is 17 holes tall and 21 holes wide. It was very hard to work with because it is so small. The tail was particularly hard to do. Once you do the edges it makes them more rounded and not so angular.
She is softer once the edging is done. I recommend doing the edging first! Then fill in the stitches.
When you add the Ghosts, Pumpkins and Cat, use that same color yarn to attach the item to the container and the Tombstone.
If you need any further help or questions, leave a comment here and I will answer your query.
Happy Halloween!!!!


No comments:
Post a Comment
Thank you for your comment! However, if you are just commenting to get me to come look at your page because you are selling something, I will delete your post.